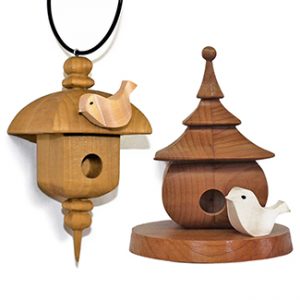
![]() Charming birdhouses bring summer inside all year long
Charming birdhouses bring summer inside all year long
By Sue Mey
I wanted to make a large 3-D birdhouse that would wow a viewer, but was limited by the wood thickness my scroll saw could cut. My solution was to divide the project into four quarters that could then be glued together into a larger finished project.
The success of this project depends on two factors: precisely cutting and sanding the blanks to size before applying the patterns, and carefully and consistently cutting on the pattern lines.
If your saw will not cut wood that is nearly 2″ (5.1cm) thick, reduce the pattern size slightly and use thinner wood.
Download the birdhouse pattern HERE.
Download the bird pattern HERE.
Making the Birdhouses
Step 1: Cut the wood blanks to size. Use a table saw. If you do not have a table saw, cut the blanks slightly oversized and sand them to the exact dimensions with a disc or belt sander. Cover the blanks with blue painter’s tape. Fold the patterns on the dotted lines, apply adhesive to the back of the patterns, align the fold with the corner of the blank, and press the pattern into place.
Step 2: Cut along one side. Use a #9 blade. Make a single continuous cut along the perimeter. Vacuum away the dust, and use clear tape to secure the pieces in place.
Step 3: Rotate the blank 90°. Cut along the perimeter line of the second side. Carefully remove the piece from the center of the scrap and peel off any remaining pattern and tape. Repeat Steps 2 to 3 for the remaining three quarters.
Step 4: Glue and clamp together two quarters to make the first half. Make sure the edges line up as well as possible. Repeat the process with the other two quarters to create the second half.
Step 5: Finish assembling the project. Glue and clamp the two halves together. Allow the glue to dry. Hand sand the outer surfaces and remove any irregularities. Drill a 3/4″ (19mm)-diameter hole where indicated. Apply several coats of clear spray finish, sanding lightly between coats with 500-grit sandpaper.
Step 6: Display the birdhouse. For the base, transfer the pattern to the blank and cut the base with a #3 blade. Round the edges with sandpaper. Center and glue the birdhouse to the base. Add a dowel or screw through the bottom of the base into the birdhouse if desired. Alternately, drill a small pilot hole in the top and insert a screw eye into the hole to hang the birdhouse.
Step 7: Compound-cut the bird. Round the edges with sandpaper or a rotary tool with a sanding drum. Apply a clear finish. Glue the bird to the base or drill matching holes and use a dowel or bamboo skewer to attach the bird to the birdhouse roof.
Materials:
- Basswood or jelutong, 1 7/8″ (4.8cm) square: tall birdhouse, 4 each 7″ (17.8cm) long; short birdhouse, 4 each 5 3/4″ (14.6cm) long
- Wood of choice, 3/4″ (1.9cm) thick: base, 5″ (12.7cm) square
- Wood of choice, 1 1/2″ (3.8cm) square: bird, 2 1/4″ (5.7cm) long
- Spray adhesive
- Tape: blue painter’s, clear
- Wood glue
- Finish: Clear spray
- Sandpaper
- Screw eye: Small
Tools:
- Table saw OR other saw with disc or belt sander
- Scroll saw blades: #3, #9
- Clamps
- Drill with assorted bits
About the Author
Sue Mey lives in Pretoria, South Africa. To see more of her work, including a wide variety of patterns and pattern-making tutorials available for purchase, visit www.scrollsawartist.com. She is the author of a pattern book, Lighted Scroll Saw Projects. Contact Sue at suem@storage.co.za.
The post Decorative Birdhouses appeared first on Scroll Saw Woodworking & Crafts.
 Charming birdhouses bring summer inside all year long